Reading a Punched Card
The programs we wrote for ‘O’-level were written on coding sheets and then taken up to Nene College by our teacher. There, they were transformed into punched cards and run on the computer. A week later, the resulting line printer output and punched card decks were returned to us.
I still have some of the punched card decks for these programs. Since I don’t have access to a punched card reader, I decided to read them by photographing them and then writing some image processing software to recover the data on each of them.
Taking the Photographs
The key information we need from an image of a punched card is which parts of the image are background and which are punched card. The ideal image would consist of a punched card silhouetted against a background of completely blown-out white.
I started with a softbox on the floor pointing upwards. This provided a very bright source of diffuse light.
Above the softbox I placed a A3-sized piece of clear perspex from a picture frame to provide a stable horizontal surface on which to place the punched card.
Above this, a camera mounted on a tripod and angled to point vertically downwards. This camera was placed as high above the perspex as possible to provide the best chance of keeping the sensor plane parallel with the plane of the punched card.
The focal length was chosen so that the card filled about half of the frame so that precise position of the card was not important, allowing fast placing of the card, and to reduce any pincushion distortion of the card image.
The light intensity was adjusted to blow out the background with an exposure at f/8 and to provide plenty of depth of field so the card would be nicely sharp all over even if the plane of the card was not parallel to the plane of the sensor.
Finally, The camera was connected to a PC to allow tethered shooting of images automatically captured every three seconds. Once this was set going, all that I had to do was remove the old card and place the new one in position within three seconds. (This rate of 20 card per minute is only one order of magnitude slower than the 300cpm rate of the real ICL card reader that originally read them.)
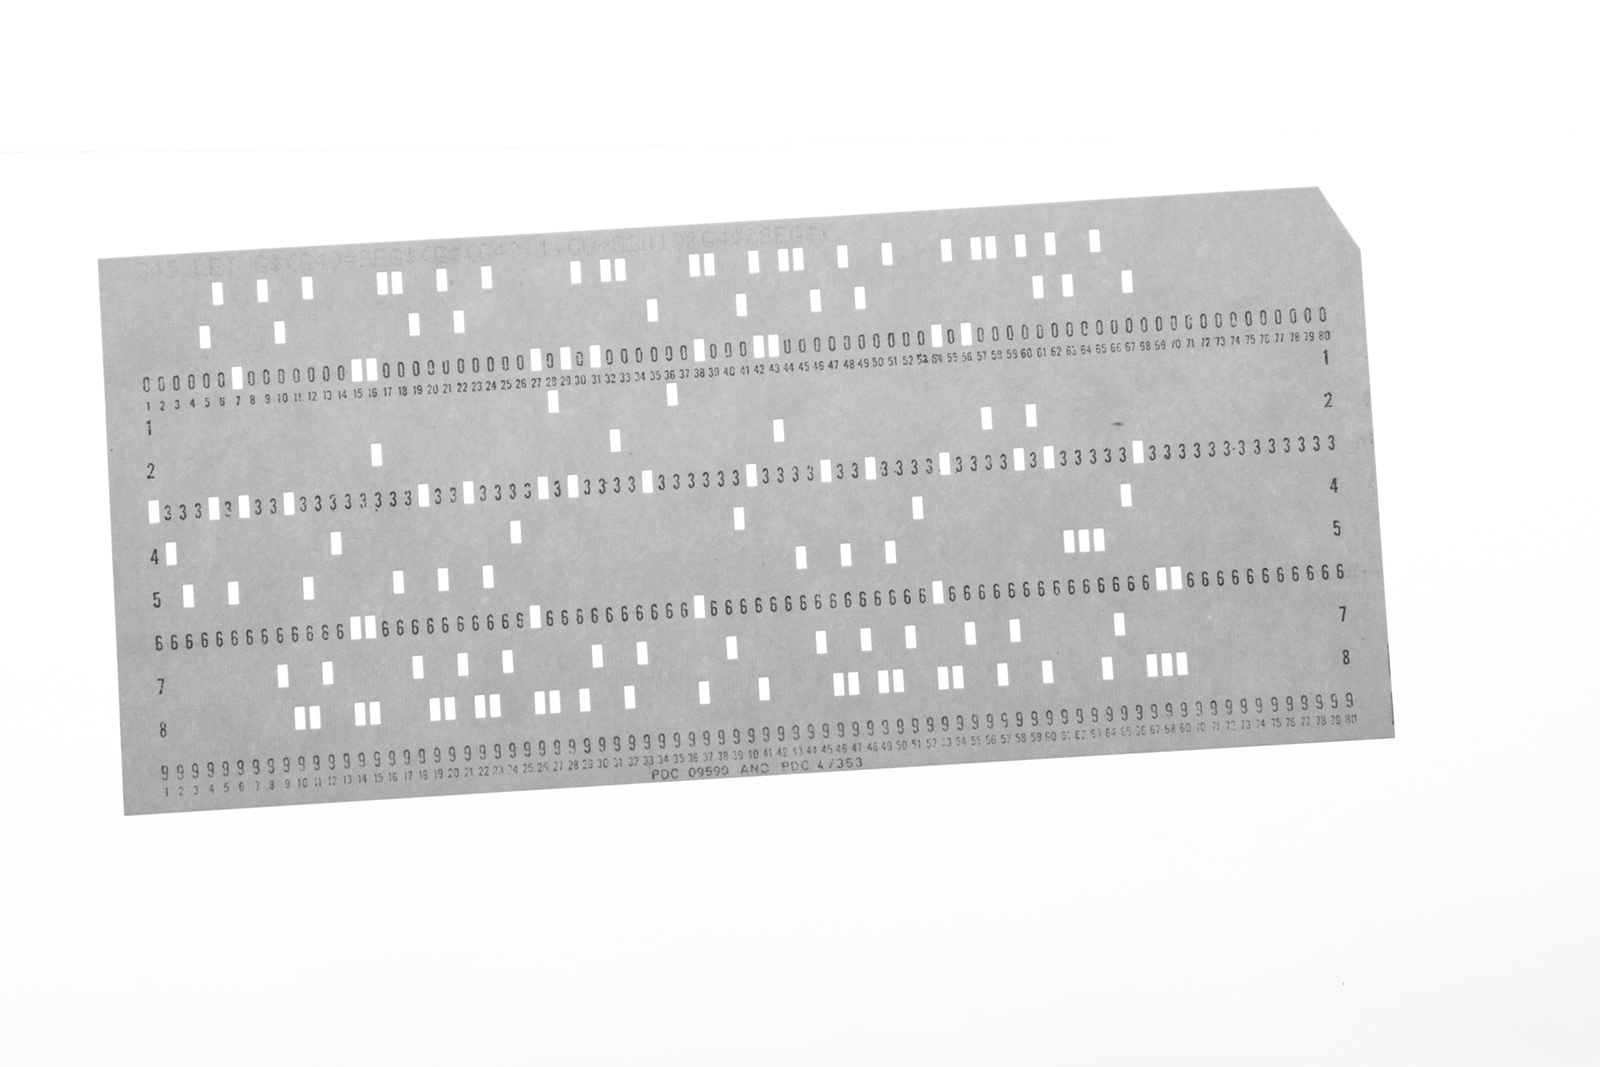
The results look like this:

As you can see, I wasn’t completely successful in blowing out the background all over the image but the results were easily fit for purpose.
Writing the Software
The rest of this page presents a python script that reads in a single card and prints out the corresponding test. I wrapped this in a main function that wild-carded over a directory of card images representing a single card deck and processed each image in turn.
Some Helpful Packages
We’ll need the following python packages:
- The Python Imaging Library (PIL), to manipulate the pixels in the photographs and apply the perspective transformation to the card
matplotlib.pyplot, a collection of command style functions for creating graphics. This isn’t needed to extract the information from the card, we just use it to to annotate the images to illustrate the effects of our processingnumpy, a package for matrix handling that we will use to calculate the perspective transformation needed to project the image of the card back into its correct form
so let’s start off by importing them:
import matplotlib.pyplot as plt
import Image
import ImageDraw
import sys
import numpy
The Geometry of a Standard Punched Card
We use the following sizes, in thousands of an inch, of a standard punched card with dimensions of 7⅜” by 3¼”:
CARDWIDTH=7375            # The width of the card
CARDHEIGHT=3250           # The height of the card
HOLEWIDTH=54              # The width of a punched hole
HOLEHEIGHT=124            # The height of a punched hole
COLSPACING=87             # Horizontal separation of hole centres
ROWSPACING=CARDHEIGHT/13  # Vertical separation of hole centres
FIRSTCOLUMN=250           # Centre of first column of holes
We will assume that the card is positioned close enough to the centre of the image that the central 100px × 100px area is all within the bounds of the punched card.
How Characters are Encoded
There are 80 columns on the card, representing eighty characters. Each column contains twelve rows where holes may be punched. The top two rows are referred to as zones and labelled by ICL as ‘R’ (for the top one) and ‘X’ for the one below it. The remaining ten rows are labelled 0 to 9.
We represent each encoding of a character with a twelve-bit number, bit 0 representing the 0 column and bit 11 representing the ‘R’ column. The following function converts a list of columns (such as [‘R’, 1]) into its twelve bit equivalent:
def C(l):
    m = {0:  0b001000000000, 1:   0b000100000000, 2:   0b000010000000,
         3:  0b000001000000, 4:   0b000000100000, 5:   0b000000010000,
         6:  0b000000001000, 7:   0b000000000100, 8:   0b000000000010,
         9:  0b000000000001, 'R': 0b100000000000, 'X': 0b010000000000
        }

    return sum([m[i] for i in l])
and we can use it to create a dictionary mapping these codes onto the corresponding ICL character:
codes = {
    C([]):        ' ',
    C([0]):       '0',
    C([1]):       '1',
    C([2]):       '2',
    C([3]):       '3',
    C([4]):       '4',
    C([5]):       '5',
    C([6]):       '6',
    C([7]):       '7',
    C([8]):       '8',
    C([9]):       '9',
    C(['R']):     '&',
    C(['R',0]):   '&', # Undocumented but seems to match our cards
    C([3,8]):     '#',
    C([4,8]):     '@',
    C([5,8]):     '(',
    C([6,8]):     ')',
    C([7,8]):     ']',
    C(['R',1]):   'A',
    C(['R',2]):   'B',
    C(['R',3]):   'C',
    C(['R',4]):   'D',
    C(['R',5]):   'E',
    C(['R',6]):   'F',
    C(['R',7]):   'G',
    C(['R',8]):   'H',
    C(['R',9]):   'I',
    C(['X',1]):   'J',
    C(['X',2]):   'K',
    C(['X',3]):   'L',
    C(['X',4]):   'M',
    C(['X',5]):   'N',
    C(['X',6]):   'O',
    C(['X',7]):   'P',
    C(['X',8]):   'Q',
    C(['X',9]):   'R',
    C([0,2]):     'S',
    C([0,3]):     'T',
    C([0,4]):     'U',
    C([0,5]):     'V',
    C([0,6]):     'W',
    C([0,7]):     'X',
    C([0,8]):     'Y',
    C([0,9]):     'Z',
    C(['X']):     '-',
    C(['X',0]):   '"',
    C([0,1]):     '/',
    C(['R',2,8]): '+',
    C(['R',3,8]): '.',
    C(['R',4,8]): ';',
    C(['R',5,8]): ':',
    C(['R',6,8]): ',',
    C(['R',7,8]): '!',
    C(['X',2,8]): '[',
    C(['X',3,8]): '$',
    C(['X',4,8]): '*',
    C(['X',5,8]): '>',
    C(['X',6,8]): '<',
    C(['X',7,8]): '^',        # Should be up arrow
    C([0,2,8]):   u'\u00A3',  # UK pounds sign
    C([0,3,8]):   ',',
    C([0,4,8]):   '%',
    C([0,5,8]):   '?',
    C([0,6,8]):   '=',
    C([0,7,8]):   '~',        # Should be left arrow
}
Now all we need to do is find the holes in a punched card.
Differentiating Card from Background
To start with, let’s write a little python script to see what the distribution of brightness in the photographs looks like:
def plot_brightness():

    # Get the photograph of the punched card named on the command line
    image = Image.open(sys.argv[1])
    bitmap = image.load()

    # We'll build a histogram of the brightness of the pixels
    histogram = [0 for i in range(256)]

    for col in range(image.size[0]):
        for row in range(image.size[1]):

            # Get the red/green/blue components of each pixel and
            # calculate a naive brightness
            r, g, b = bitmap[col, row]
            brightness = (r + g + b) / 3

            # Build the histogram pixel by pixel
            histogram[brightness] += 1

    # The simplest possible plot will suffice.
    plt.plot (range(256), histogram)
    plt.ylabel('Pixels')
    plt.xlabel('Brightness')
    plt.save('brightness_histogram.png')
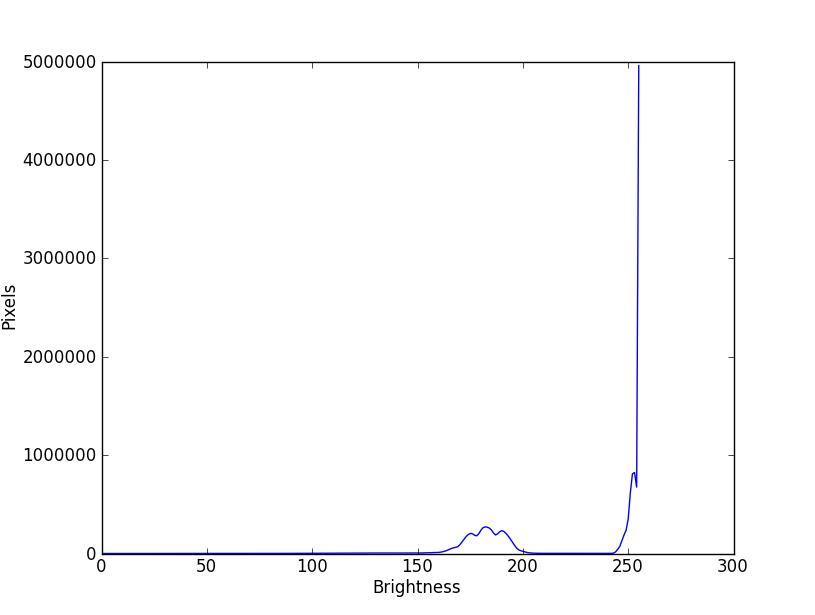
We find that there are two clumps of pixels. Between 150 and 200 are the pixels belonging to the image of the punched card. Above 240 are all of the pixels belonging to the background. Most are burnt out or very close to being so:

This suggests that we can easily distinguish between card and background by seeing whether the pixel brightness is above or below a threshold of 220. Here’s how we’ll decide if a pixel is bright or not:
THRESHOLD=220
def pixel_is_bright(pixel):
    r, g, b = pixel
    return (r + g + b) / 3 > THRESHOLD
(While the real brightness is more complicated than this to calculate - because we need to take into account the colour space of the image - this simple version will be good enough for our needs.)
Detecting a Card Edge
To spot an edge of the card, we will start from the corresponding edge of the image and inspect pixels along a line perpendicular to the edge until we encounter a pixel that is no longer bright. (We could be cleverer than this by doing a binary chop between the edge of the image, known to be background, and the centre of the image, assumed to be punched card, but it simply isn’t worth it - this isn’t a significant part of the execution time compared to the perspective transformation we’ll do later.)
Here’s a useful function that does this. Given a point known to be
not within the card and a vector defining the direction (for example,
(0, 1) meaning down), it looks for a transition from bright to dark
until it runs out of image to test. It returns a tuple (x,y) on the
edge of the card or None if none was found.
def find_edge(image, start, direction):
    """Find an edge of the punched card.

    Find the pixel at which we transition from background to punched
    card.

    image     - the Image object to search, known to be centred on the card
    start     - a position on the background, typically an image edge
    direction - a tuple (dx,dy) defining the direction of the search

    returns a tuple (x,y) being a pixel on the edge of the card
    """
    # Get an API that provides fast access to the pixels:
    bitmap = image.load()

    # Unpack the arguments
    dx, dy = direction
    maxx, maxy = image.size

    # We haven't yet found an edge
    edge = None

    # Start where we were asked to and advance by the given vector
    # until we either run out of image or we find a pixel belonging
    # to the card

    x, y = start
    while not edge and 0 <= x < maxx and 0 <= y < maxy:

        if pixel_is_bright(bitmap[x, y]):
            x += dx
            y += dy
        else:
            edge = (x, y)

    return edge
Finding the Corners of the Card
If we know the equations of lines running along two adjacent edges of the punched card, we can intersect them to find their common corner. As we’ll need to find pairs of points on each edge, here’s a handy function to obtain them.
To find two points on the card edge, we start with the midpoint of the
corresponding image edge, move shift pixels in both directions away
from the midpoint to get two points on the image edge and then search
for the card edge at those two points using our existing function.
def two_points_on_edge(image, image_edge_midpoint, shift, direction_vector):

    width, height = image.size
    edge_mx, edge_my = image_edge_midpoint
    dx, dy = direction_vector

    # Given the midpoint of the edge, select two points one quarter
    # of the image size away in either direction.
    edge_a = (edge_mx + shift*dy, edge_my + shift*dx)
    edge_b = (edge_mx - shift*dy, edge_my - shift*dx)

    # Find the card edge at each of these two positions
    card_a = find_edge(image, edge_a, direction_vector)
    card_b = find_edge(image, edge_b, direction_vector)

    return (card_a, card_b)
Given a pair of points for each of two adjacent edges, we can use the following function to find the corner where they intersect:
def corner_of_edges(edge_a, edge_b):

   a1, a2 = edge_a
   Aa = a2[1] - a1[1]
   Ba = a1[0] - a2[0]
   Ca = Aa*a1[0] + Ba*a1[1]

   b1, b2 = edge_b
   Ab = b2[1] - b1[1]
   Bb = b1[0] - b2[0]
   Cb = Ab*b1[0] + Bb*b1[1]

   D = Aa*Bb - Ab*Ba
   x = (Bb*Ca - Ba*Cb) / D
   y = (Aa*Cb - Ab*Ca) / D

   return (x, y)
Now we have all we need, we’ll proceed as follows:
- As we know that the central 100px × 100px is all card, find an approximate equation of each edge by finding the card edge at the midpoint of each side of the image ± 50px.
- Intersect all pairs of adjacent edges to determine the corners.
- Now we know the full extent of the card edges, repeat the process of determining the equations of the edges by using two points on each edge separated by three quarters of the edge length.
- Intersect these more accurate lines to get our real corner locations.
Here’s how we do it:
def card_corners(image):

    width, height = image.size

    image_top    = (width/2, 0)
    image_left   = (0, height/2)
    image_bottom = (width/2, height-1)
    image_right  = (width-1, height/2)

    card_top    = two_points_on_edge(image, image_top,    50, (0, 1))
    card_left   = two_points_on_edge(image, image_left,   50, (1, 0))
    card_bottom = two_points_on_edge(image, image_bottom, 50, (0, -1))
    card_right  = two_points_on_edge(image, image_right,  50, (-1, 0))

    tl = corner_of_edges(card_left, card_top)
    tr = corner_of_edges(card_top, card_right)
    br = corner_of_edges(card_right, card_bottom)
    bl = corner_of_edges(card_bottom, card_left)

    card_top    = two_points_on_edge(image, ((tl[0] + tr[0])/2, 0), (tr[0]-tl[0])*3/8, (0, 1))
    card_left   = two_points_on_edge(image, (0, (tl[1] + bl[1])/2), (bl[1]-tl[1])*3/8, (1, 0))
    card_bottom = two_points_on_edge(image, ((bl[0] + br[0])/2, height-1), (br[0]-bl[0])*3/8, (0, -1))
    card_right  = two_points_on_edge(image, (width-1, (tr[1] + br[1])/2), (br[1]-tr[1])*3/8, (-1,0))

    tl = corner_of_edges(card_left, card_top)
    tr = corner_of_edges(card_top, card_right)
    br = corner_of_edges(card_right, card_bottom)
    bl = corner_of_edges(card_bottom, card_left)

    return (tl, tr, br, bl)
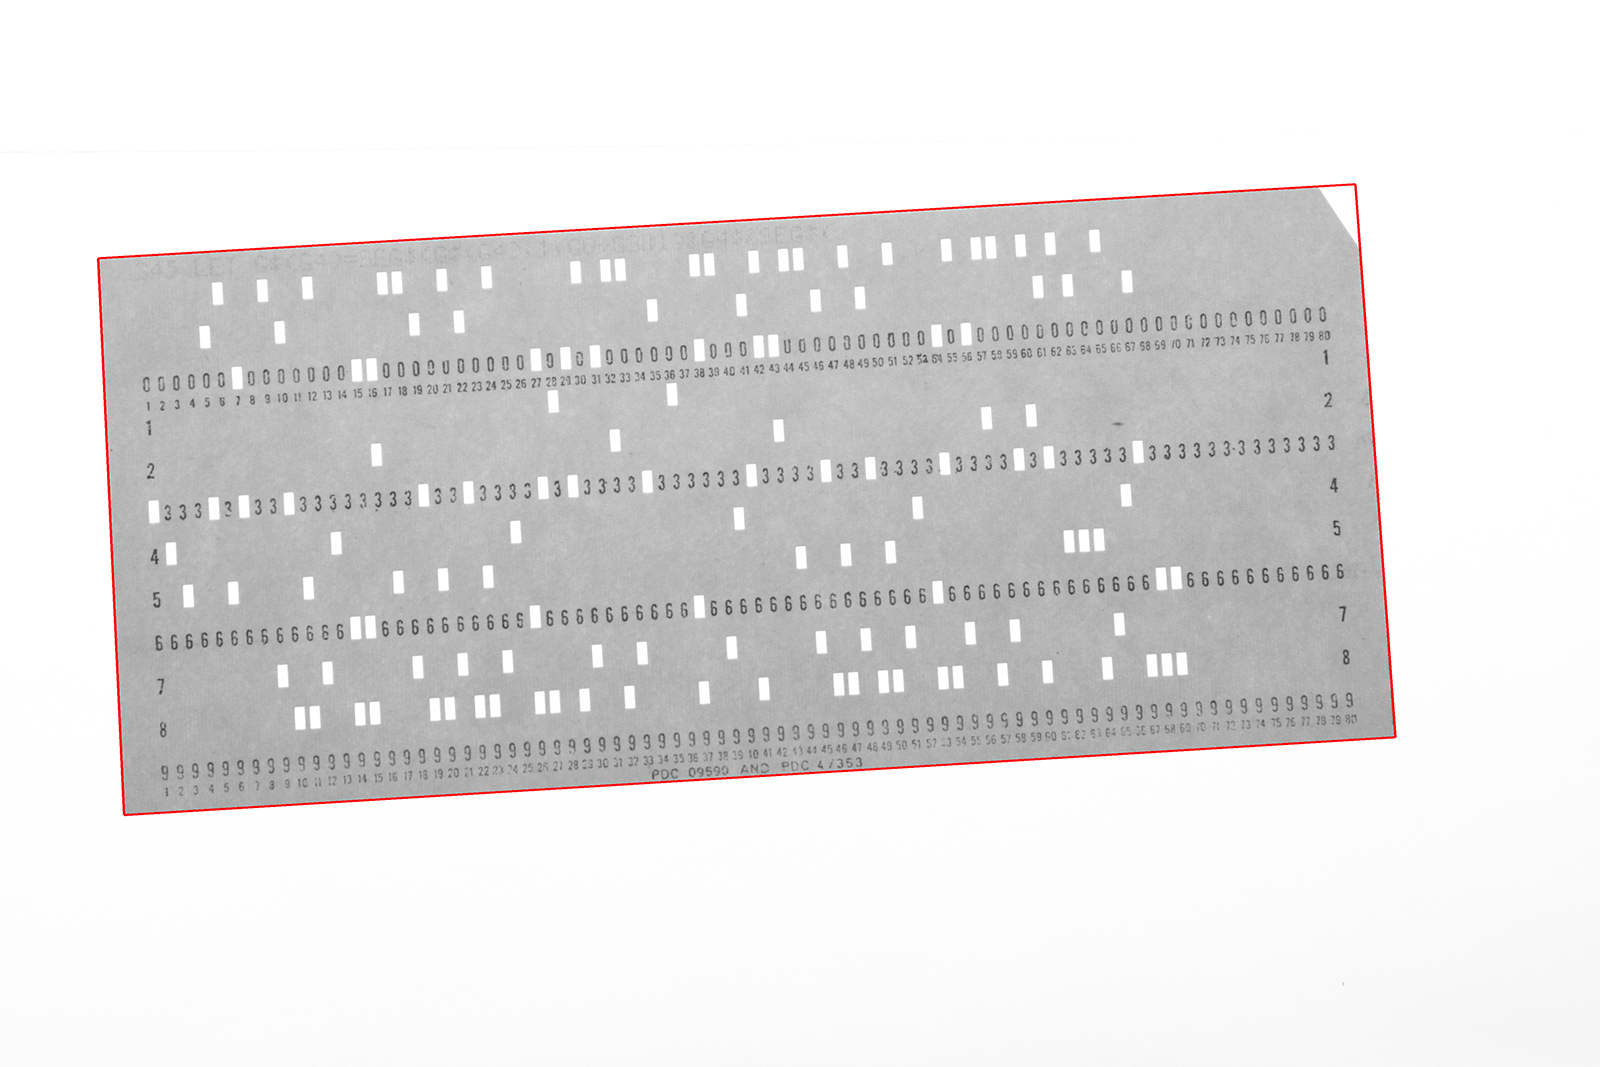
Here’s our card image again but this time with the bounding rectangle of the card drawn in red using the locations of the four corners we have just created:

Recovering the Orthonormal Card Image
We are now going to transform the image so that the card appears with its top left corner at the top left corner of the image and with its edges parallel to the x and y axes. We know the dimensions of a standard punched card (7.375” wide by 3.250” high) so for each of the four corners we have found, we know the coordinates to which they are to be mapped.
The Image module provides a method to apply a perspective transform to an image to yield a transformed one:
result = image.transform((width, height), Image.PERSPECTIVE, transform, Image.BICUBIC)
The third arguments, transform, is an eight-element vector defining the
transform to be applied. Determining this is a common problem in 3D graphics
and a little searching of the web allows us to discover that for points (x,y)
to be transformed to the points (X,Y), we end up with a matrix equation:
where our x, y, X and Y values are our known before and after points and the unknowns a .. h are our perspective transform vector P. If we write this in the form
then we can rearrange this in the obvious way to get P:
At this point, most mathematicians will warn us that this isn’t a very stable approach and that we will accumulate a lot of rounding errors computing the inverse. They might well recommend this equivalent path:
or even suggest that we solve our set of linear simultaneous equations by gaussian elimination. For now, we’ll take the the obvious path.
The following function accepts two lists of four points (the before and after card corners) and returns our perspective transformation vector.
def perspective_transform(given, wanted):

    aij = []
    for i in range(4):
        x, y = given[i]
        X, Y = wanted[i]
        aij.append([x, y, 1, 0, 0, 0, -X*x, -X*y])
        aij.append([0, 0, 0, x, y, 1, -Y*x, -Y*y])

    A = numpy.matrix(aij, dtype=numpy.float)
    B = numpy.array(wanted).reshape(8)

    P = numpy.dot(numpy.linalg.inv(A), B)
    return numpy.array(P).reshape(8)
at this point we can now write a function to return a perspective-corrected image of a punched card given the pathname to the original image:
def corrected_card_image(image_path):

    image = Image.open(image_path)

    # Locate the corners of the projected card rectangle
    corners = card_corners(image)

    # The location of the corners of a standard punched card
    standard_card = ((0, 0),
                     (CARDWIDTH, 0),
                     (CARDWIDTH, CARDHEIGHT),
                     (0, CARDHEIGHT))

    # The perspective transform between the two
    transform = perspective_transform (standard_card, corners)

    # Transform the quadrilateral of the projected card in the image
    # into a rectangle CARDWIDTH by CARDHEIGHT.
    new_image = image.transform(
        (CARDWIDTH, CARDHEIGHT),
        Image.PERSPECTIVE,
        transform,
        Image.BICUBIC)

    return new_image
Locating Punched Holes
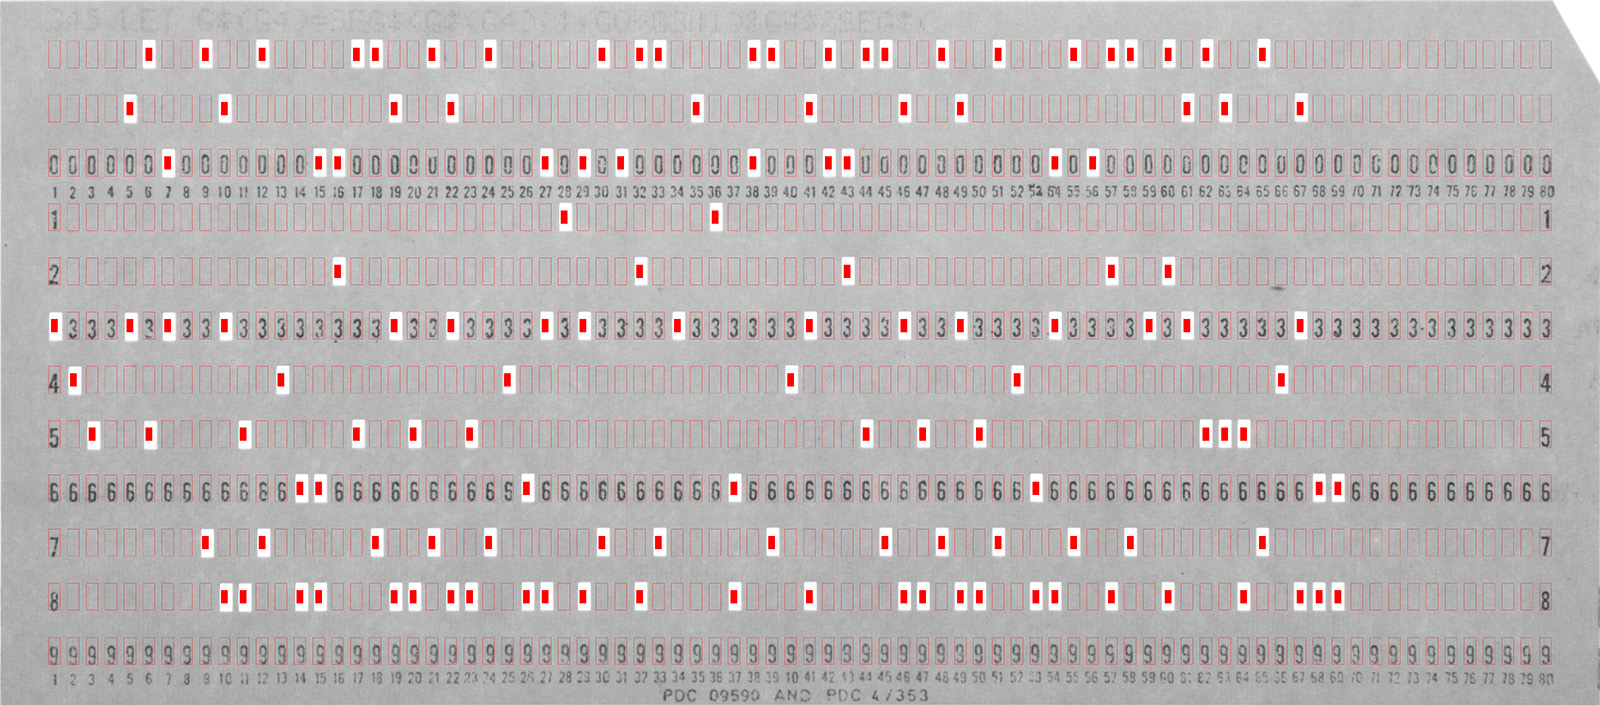
We will now take an image and draw a red rectangle around the expected position of each hole and a small filled red rectangle where we identify a punched hole:
def locate_holes(image_pathname):

    # Our punched card
    image = corrected_card_image(image_pathname)
    bitmap = image.load()

    # A graphics context for drawing our decisions on the image
    graphics_context = ImageDraw.Draw(image)

    # There are eighty columns on the card.
    for col in range(80):

        # If you divide the card into thirteen equally spaced rows, the
        # holes occupy rows 1 to 13.
        for row in range(1,13):

            # The expected centre of this hole
            x = FIRSTCOLUMN + col*COLSPACING
            y = CARDHEIGHT*row / 13

            if pixel_is_bright(bitmap[x,y]):

                # Pixel is bright so this is a hole. Draw a 30x60 solid
                # rectangle at its centre
                graphics_context.rectangle(((x-15, y-30), (x+15, y+30)), fill='red')

            else:

                # Pixel is dark so this is not a hole.
                graphics_context.rectangle(((x-HOLEWIDTH/2, y-HOLEHEIGHT/2),
                                            (x+HOLEWIDTH/2, y+HOLEHEIGHT/2)),
                                           outline='red')

    image.save("punchedcard_holes.png")
which produces the following:

Decoding
The remaining task is to map each column’s holes into its character. The following function is like the one above but instead of drawing each hole, it accumulates the set bits for each column and then maps them into characters, returning the character string:
def decode(image_pathname):

    text = ''
    # Our punched card
    image = corrected_card_image(image_pathname)
    bitmap = image.load()

    # There are eighty columns on the card.
    for col in range(80):

        # Each time we find a hole, we accumulate its value here:
        code = 0

        # If you divide the card into thirteen equally spaced rows, the
        # holes occupy rows 1 to 13. Process each row in turn
        for row in range(1,13):

          # The expected centre of this hole
          x = FIRSTCOLUMN + col*COLSPACING
          y = CARDHEIGHT*row / 13

          if pixel_is_bright(bitmap[x,y]):
            bit_position = 12 - row
            code |= (1 << bit_position)

        # Look the code up in our character map
        text += codes[code]

    return text

if __name__ == '__main__':
    print decode ('punchedcard_original.jpg')
When we run this, the text of the card is displayed:
345 LET G$(G4)=SEG$(G$(G4),1,G0+G3-1)&G4$&SEG$(G$(G4),G0+G3+LEN(G4$))
